redline transmission fluid manual

Red Line transmission fluids are meticulously engineered for manual transmissions, offering superior performance and protection; These fluids enhance shifting,
extend component life, and maximize power transfer, catering to both daily drivers and high-performance vehicles․ They are a popular choice among enthusiasts․
Specifically formulated to withstand extreme conditions, Red Line fluids provide exceptional thermal stability and shear resistance, ensuring consistent viscosity
and lubrication across a wide temperature range․ This translates to smoother operation and reduced wear, even under demanding driving scenarios․
What is Red Line Transmission Fluid?
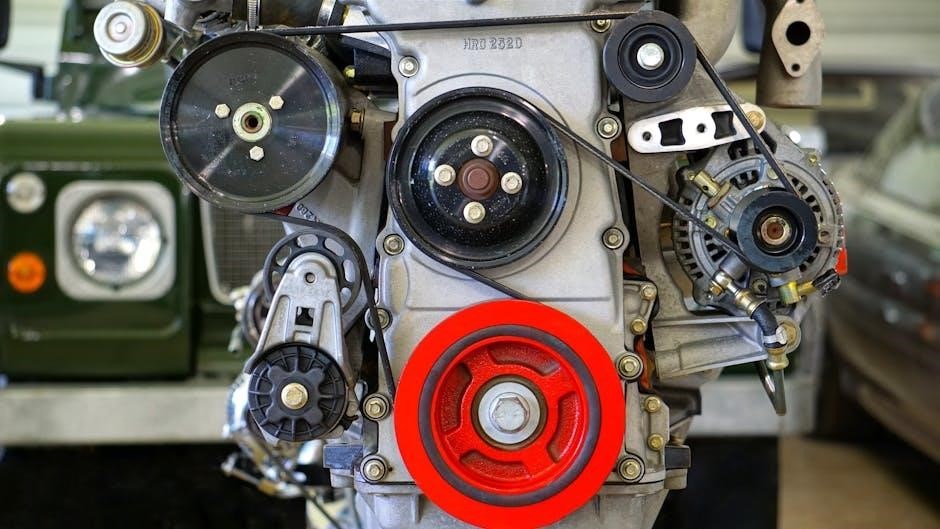
Red Line transmission fluid represents a significant advancement in lubricant technology, specifically designed for manual transmissions․ Unlike conventional gear oils, Red Line fluids utilize a unique synthetic base oil combined with specialized additives to deliver unparalleled performance and protection․ This formulation minimizes friction, maximizes power transfer, and extends the lifespan of transmission components․
At its core, Red Line fluid isn’t simply a lubricant; it’s an engineered solution․ The inclusion of “ShockProof” technology, featuring microscopic solid additives, creates a cushioning layer between gear teeth, absorbing impacts and reducing wear․ This is particularly crucial in high-performance applications where gear stress is significantly increased․ Furthermore, Red Line fluids boast exceptional thermal stability, resisting breakdown even at elevated temperatures, ensuring consistent viscosity and lubrication․
These fluids are available in a range of viscosities (70W/75W, 75W80, 75W85, 75W90, and 75W140) and API GL-4/GL-5 classifications to suit diverse transmission requirements and driving conditions․ They are a premium choice for those seeking optimal transmission performance and longevity․
Why Choose Red Line for Your Manual Transmission?
Selecting Red Line transmission fluid for your manual transmission offers a multitude of benefits over conventional lubricants․ The primary advantage lies in its superior protection against wear and tear, thanks to the innovative “ShockProof” technology․ This minimizes gear damage, especially under aggressive shifting or high-torque applications, extending the transmission’s lifespan considerably․
Furthermore, Red Line fluids are engineered to reduce internal drag, resulting in increased efficiency and potentially improved horsepower delivery․ The stable viscosity across a broad temperature range ensures consistent performance, whether operating in extreme heat or cold․ This stability prevents viscosity breakdown, maintaining optimal lubrication․
For enthusiasts and performance drivers, Red Line provides smoother, more precise shifting, enhancing the overall driving experience․ The fluid’s resistance to foaming also contributes to consistent performance․ Choosing Red Line is an investment in the longevity and optimal operation of your manual transmission․

Types of Red Line Transmission Fluids
Red Line offers a diverse range of manual transmission fluids, including MTL, MT-LV, MT-85, MT-90, and 75W140NS, each formulated for specific applications and performance needs․
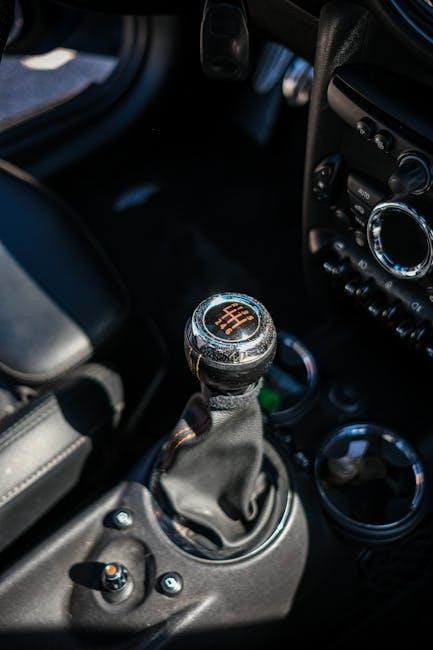
MTL 75W80 GL-4 Gear Oil
MTL 75W80 GL-4 is a highly regarded, all-synthetic gear oil specifically designed for many manual transmissions, particularly those requiring a GL-4 specification․ It’s known for its exceptional ability to improve shifting performance and protect gears from wear, even under strenuous conditions․
This fluid boasts a unique composition featuring microscopic solid additives – Red Line’s signature ShockProof technology – which create a cushioning layer between gear teeth․ This minimizes impact stress and reduces noise, while simultaneously maintaining low drag for increased efficiency․ The 75W80 viscosity grade ensures optimal lubrication across a broad temperature spectrum, providing excellent cold-weather fluidity and high-temperature stability;
MTL is a popular choice for transmissions in vehicles like BMW, Porsche, and Nissan, where it helps to address common issues like sticky synchros and notchy shifts․ It’s compatible with yellow metals (brass and bronze) commonly found in older transmissions, making it a versatile option for both classic and modern vehicles․ Its superior film strength and resistance to oxidation contribute to extended fluid life and reduced maintenance intervals․
MT-LV 70W/75W GL-4 Gear Oil
MT-LV 70W/75W GL-4 is a premium, fully synthetic gear oil formulated to meet the demanding requirements of modern manual transmissions, particularly those specified by manufacturers like BMW and Getrag․ It’s designed to provide exceptional shift quality and protect against wear in transmissions that traditionally require lower viscosity fluids․
This fluid’s multi-viscosity nature ensures optimal lubrication across a wide range of temperatures, offering excellent cold-flow properties for easy shifting in cold weather and maintaining sufficient viscosity at high operating temperatures․ Like other Red Line products, MT-LV incorporates ShockProof technology, utilizing microscopic solid additives to cushion gear teeth and reduce noise․
MT-LV is specifically engineered to be compatible with the materials used in modern transmissions, including those with copper-alloy synchronizers․ It helps to resolve common issues like rough shifting and synchro wear, restoring smooth and precise gear engagement․ Its high shear stability and oxidation resistance contribute to extended fluid life and reduced maintenance costs, making it a cost-effective solution for discerning vehicle owners․
MT-85 75W85 GL-4 Gear Oil
Red Line’s MT-85 75W85 GL-4 gear oil is a fully synthetic, high-performance lubricant specifically designed for manual transmissions requiring a higher viscosity than the commonly used 75W80 fluids․ It’s an excellent choice for transmissions experiencing noise or exhibiting shift quality issues with lighter weight oils, offering enhanced protection and smoother operation․
This fluid’s formulation provides superior film strength and shear stability, ensuring consistent lubrication even under extreme loads and high temperatures․ The 75W85 viscosity grade delivers improved gear protection, particularly in transmissions with heavy-duty components or those subjected to aggressive driving styles․ Like all Red Line gear oils, MT-85 benefits from ShockProof technology․
MT-85 is compatible with most yellow metal alloys, making it suitable for a wide range of transmission applications․ It’s a particularly effective solution for transmissions that specify a GL-4 rating and benefit from a slightly thicker fluid for improved performance and longevity, reducing wear and extending the life of the gearbox․
MT-90 75W90 GL-4 Gear Oil
Red Line’s MT-90 75W90 GL-4 gear oil represents a robust, fully synthetic lubricant tailored for demanding manual transmission applications․ It’s ideal for transmissions that require a GL-4 specification and benefit from a higher viscosity for increased protection and improved shift feel, especially in high-performance or heavily loaded scenarios․
This fluid’s formulation delivers exceptional film strength and shear stability, maintaining consistent lubrication under extreme pressures and temperatures․ The 75W90 viscosity grade provides enhanced gear protection, making it suitable for transmissions with larger gears or those experiencing significant torque․ MT-90 incorporates Red Line’s signature ShockProof technology for superior impact resistance․
Designed for compatibility with yellow metals commonly found in transmissions, MT-90 minimizes the risk of corrosion and wear․ It’s a preferred choice for enthusiasts and professionals seeking a reliable, high-performance gear oil that extends transmission life and optimizes shifting performance, offering a noticeable improvement in drivetrain efficiency․
75W140NS GL-5 Gear Oil
Red Line’s 75W140NS GL-5 gear oil is a premium, fully synthetic lubricant engineered for high-performance manual transmissions and differentials requiring a GL-5 specification․ The “NS” designation signifies its non-corrosive formulation, making it safe for use with yellow metals like brass and bronze commonly found in transmission components․
This fluid boasts exceptional extreme pressure (EP) performance and shear stability, ensuring robust gear protection even under the most demanding conditions․ The 75W140 viscosity provides a thicker oil film, ideal for transmissions experiencing high loads or operating at elevated temperatures․ Red Line’s ShockProof technology further enhances its ability to withstand impact and reduce wear․
75W140NS delivers superior lubrication, minimizing friction and maximizing power transfer․ It’s a favored choice for enthusiasts and motorsport applications where reliability and performance are paramount, offering extended component life and smoother operation․ This oil is a great choice for those seeking maximum protection and efficiency․

Understanding Transmission Fluid Specifications
Red Line transmission fluid specifications, like viscosity and GL ratings, are crucial for optimal manual transmission performance and longevity․
Understanding these ensures correct fluid selection․
Viscosity and Temperature
Viscosity, a fluid’s resistance to flow, dramatically changes with temperature․ Red Line transmission fluids are graded using a system like 75W-80, indicating cold-weather (W-Winter) and operating viscosity․ The “75W” signifies the fluid’s viscosity at low temperatures, ensuring easy shifting even in frigid conditions․ Lower numbers mean better flow in the cold․
The second number, “80” in this example, represents the viscosity at 100°C (212°F), the standard operating temperature for automotive transmissions․ Red Line meticulously formulates its fluids to maintain optimal viscosity across a broad temperature spectrum․ This is vital because excessively thick fluid hinders flow, increasing drag and reducing efficiency, while too-thin fluid compromises lubrication and protection․
Red Line’s advanced formulations ensure consistent viscosity, even under extreme heat, preventing breakdown and maintaining a protective film between gear teeth․ This temperature stability is a key benefit for high-performance manual transmissions subjected to intense stress and heat generation․
Viscosity Index Explained
The Viscosity Index (VI) is a crucial metric indicating how much a fluid’s viscosity changes with temperature․ A higher VI signifies greater viscosity stability – meaning the fluid maintains its viscosity more consistently across varying temperatures․ Red Line transmission fluids boast impressively high VI numbers, often exceeding 177, demonstrating superior performance compared to conventional fluids․
For manual transmissions, a high VI is particularly important․ It ensures consistent lubrication during both cold starts and high-temperature operation, preventing viscosity thinning or thickening․ Thinning reduces the oil film’s protective strength, while thickening increases drag and reduces efficiency․
Red Line’s high VI fluids minimize these issues, providing optimal gear protection and smooth shifting regardless of operating conditions․ This translates to extended component life and improved overall transmission performance․ A fluid with a lower VI will exhibit a more significant viscosity change, potentially compromising lubrication and efficiency․
GL-4 vs․ GL-5 Gear Oils
Gear oils are classified by API service levels, primarily GL-4 and GL-5․ Understanding the difference is vital for manual transmission health․ GL-4 oils are formulated for transmissions and transaxles with bronze or brass synchronizers, commonly found in older vehicles and many modern sports cars․
GL-5 oils contain extreme pressure (EP) additives – typically sulfur-phosphorus compounds – designed for hypoid gears in differentials․ However, these additives can corrode the bronze and brass synchronizers in many manual transmissions, leading to premature wear and shifting problems․
Red Line offers both GL-4 and GL-5 fluids, clearly labeled for appropriate applications․ Using the correct fluid is paramount․ Red Line’s GL-4 fluids are specifically formulated without the aggressive EP additives found in GL-5, safeguarding synchronizer integrity․ Always consult your vehicle’s owner’s manual or a trusted mechanic to determine the correct specification․

Red Line Fluid Properties & Benefits
Red Line fluids boast ShockProof technology, reducing wear and drag while enhancing efficiency․ Their superior thermal stability and consistent viscosity deliver optimal manual transmission performance․
ShockProof Technology
Red Line’s groundbreaking ShockProof technology represents a significant advancement in gear oil formulation, particularly beneficial for manual transmissions experiencing high stress․ Unlike conventional gear oils, ShockProof incorporates a microscopic solid medium – molybdenum disulfide – suspended within the fluid․ This creates a cushioning layer between gear teeth, effectively absorbing and dissipating impact forces during shifting and operation․
This innovative approach dramatically reduces wear and tear on gears, extending their lifespan and improving overall transmission reliability․ Crucially, ShockProof doesn’t compromise efficiency; the solid medium maintains remarkably low drag, ensuring optimal power transfer․ The technology excels in high-performance applications and demanding driving conditions where traditional lubricants may falter, providing superior protection and consistent performance for your manual transmission․
Reduced Drag and Increased Efficiency
Red Line transmission fluids are engineered to minimize internal drag within the manual transmission, directly translating to increased efficiency and power delivery․ This is achieved through a carefully balanced formulation that reduces friction between moving parts without sacrificing crucial film strength and protection․ Lower drag means more of the engine’s horsepower reaches the wheels, resulting in quicker acceleration and improved overall performance;
Unlike some conventional gear oils that can create significant resistance, Red Line fluids allow for smoother, more effortless shifting․ This enhanced fluidity also contributes to reduced heat generation, further improving efficiency and extending the life of transmission components․ For enthusiasts seeking to maximize their vehicle’s potential, Red Line offers a tangible performance advantage in manual transmissions․
Temperature Stability
Red Line transmission fluids exhibit exceptional temperature stability, a critical characteristic for manual transmissions operating under diverse conditions․ These fluids maintain their viscosity and lubricating properties across a remarkably wide temperature range, from frigid winter conditions to the intense heat generated during aggressive driving or track use․ This stability prevents viscosity breakdown, ensuring consistent protection for gears and bearings․

The advanced synthetic base oils used in Red Line fluids resist thermal degradation, preventing the formation of harmful sludge and deposits that can compromise transmission performance․ This superior thermal resistance extends fluid life and minimizes the need for frequent changes․ Maintaining optimal lubrication, even at extreme temperatures, is paramount for preventing wear and ensuring the longevity of your manual transmission․
Compatibility and Applications
Red Line transmission fluids are widely compatible with many manual transmissions, offering versatile solutions for diverse vehicles․ Consult vehicle-specific guides
for optimal fluid selection and ensure proper performance․
Vehicle Compatibility Guide
Determining Red Line transmission fluid compatibility requires careful consideration of your vehicle’s make, model, and specific transmission type․ While Red Line fluids are renowned for their broad applicability to manual transmissions, verifying the correct specification is crucial for optimal performance and preventing potential damage․
Red Line provides a comprehensive online compatibility chart, allowing users to input their vehicle details and receive tailored fluid recommendations․ This resource is regularly updated to reflect new vehicle releases and transmission designs․ Furthermore, consulting your vehicle’s owner’s manual is highly recommended, as it will outline the manufacturer’s specified fluid requirements․

Generally, Red Line MTL, MT-LV, MT-85, MT-90, and 75W140NS fluids are suitable for a wide range of manual transmissions found in popular vehicles from manufacturers like Honda, Nissan, Subaru, BMW, and Porsche․ However, always cross-reference with the Red Line compatibility tool and your vehicle’s documentation to ensure a perfect match․ Incorrect fluid usage can lead to shifting issues, premature wear, and even transmission failure․
Specific Transmission Applications
Red Line transmission fluids excel in diverse manual transmission applications․ For instance, the MT-LV 70W/75W GL-4 is a popular choice for many newer Honda and Acura transmissions, addressing concerns about shuddering and improving shift quality․ The MTL 75W80 GL-4 is widely used in older BMW, Porsche, and Nissan manual gearboxes, providing excellent protection and smooth operation․

Vehicles with demanding performance needs, such as Subaru WRX and STI models, often benefit from the MT-90 75W90 GL-4, offering enhanced durability and heat resistance․ For heavier-duty applications and transmissions requiring a GL-5 specification, the 75W140NS is a robust option․
It’s important to note that some transmissions may have specific fluid requirements dictated by the manufacturer․ Always verify compatibility using Red Line’s online resources or consult a qualified mechanic․ Proper fluid selection ensures optimal performance, longevity, and avoids potential warranty issues related to fluid incompatibility in your manual transmission․
Helvetica Neue Font Issues & Alternatives
Helvetica Neue availability can be problematic; designers often struggle finding complete font families, especially Medium weights, requiring alternative solutions like Nimbus Sans for similar aesthetics․
Helvetica Neue Font Availability
Helvetica Neue presents a common challenge for designers, stemming from its licensing and distribution․ While a basic Helvetica is included with macOS, it’s not the print-quality version needed for professional work․ The complete Helvetica Neue family, encompassing numerous weights and styles, typically requires a separate purchase from Monotype or other font foundries․
Many users encounter issues when attempting to edit documents utilizing specific Helvetica Neue weights, like Medium, that aren’t readily available in their Adobe software․ This often leads to font substitution, compromising the original design’s integrity․ Finding the exact TTF version used by other designers can also prove difficult, as various sources offer different iterations․
Furthermore, Adobe applications can access fonts stored within the InDesign application’s Fonts folder, but ensuring the correct version is loaded remains crucial․ The proliferation of free or incorrectly labeled fonts (like “Free Sans” masquerading as Helvetica) adds to the confusion, highlighting the need for verified font files․
Finding the Correct Helvetica Neue Version
Locating the precise Helvetica Neue version can be a frustrating endeavor․ Start by verifying the font’s origin within the document you’re editing․ If possible, identify the foundry or source where the original file was obtained․ Monotype is a primary vendor for legitimate Helvetica Neue licenses, offering various packages․
Beware of free downloads, as these often lack complete character sets or may be counterfeit․ Ensure the downloaded files include all necessary weights and styles (e․g․, Regular, Bold, Medium, Light)․ Check file extensions; OTF (OpenType) is generally preferred for print quality․
Consider exploring font identification tools that analyze existing PDFs to pinpoint the exact Helvetica Neue variant used․ If a direct match proves elusive, explore closely related alternatives like Helvetica Now Pro, which offers a modern take on the classic design․ Thoroughly test any replacement font to ensure visual consistency․
Alternatives to Helvetica Neue (Nimbus Sans)
When a precise Helvetica Neue match proves unattainable, Nimbus Sans emerges as a compelling alternative․ This open-source font family, available from Adobe, closely mimics the aesthetic qualities of Helvetica, offering a remarkably similar appearance without the licensing complexities․
Nimbus Sans provides a comprehensive range of weights and styles, enabling designers to maintain typographic consistency in their projects․ While subtle differences exist, the overall visual impact is often indistinguishable to the casual observer․ It’s a practical solution for situations where an exact replica isn’t critical․
However, careful consideration is needed․ Test Nimbus Sans thoroughly within your document to assess its suitability․ Pay attention to character spacing and rendering, as minor adjustments may be necessary․ For professional print work, always prioritize a licensed Helvetica Neue version if feasible, but Nimbus Sans is a viable substitute․